# The Ultimate Guide to DIY Product Photography for Ecommerce
Your product photography plays a crucial role in the success of your ecommerce store. Since online shoppers can’t physically see, touch, or smell your products, high-quality images help them understand what they’re purchasing. In this guide, we’ll walk you through setting up your own DIY studio, capturing professional product photos, and optimizing them for ecommerce to boost your online sales.
—
## **Part 1: How to Capture Stunning Product Photos**
### **Understand Your Camera’s Capabilities**
While DSLRs typically produce higher-quality images than smartphones, modern smartphone cameras have improved significantly. The key to great product photography lies in the setup, not just the camera. Whether you’re using a DSLR or a smartphone, understanding your camera’s features will help you maximize its potential.
#### **DSLR Product Photography**
If you own a DSLR, take advantage of its manual settings. Mastering the **exposure triangle**—aperture, shutter speed, and ISO—will help you achieve the perfect lighting and clarity for your product shots.
– **Aperture (f-stop):** Controls the amount of light entering the lens. A lower f-stop (e.g., f/1.8) creates a brighter image but may blur the background. A higher f-stop (e.g., f/10) keeps the entire product in focus.
– **Shutter Speed:** Determines how long the camera sensor is exposed to light. A slower shutter speed allows more light in, which is useful for product photography.
– **ISO:** Adjusts the camera’s sensitivity to light. Keep ISO below 400 to avoid grainy images. If your photos are too dark, increase the lighting instead of raising the ISO.
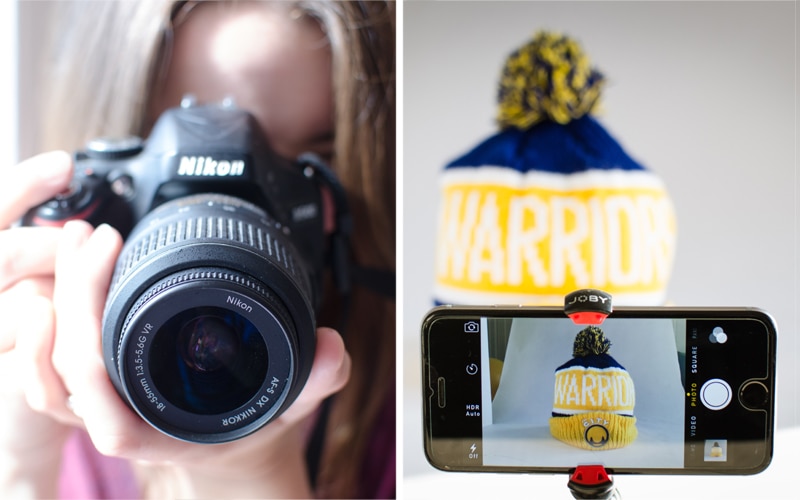
#### **Smartphone Product Photography**
If you’re using a smartphone, avoid built-in filters, frames, and digital zoom, as they reduce image quality. Instead:
– Use **auto-focus** by tapping the product on your screen before taking the shot.
– Download manual camera apps to adjust exposure settings.
– Never use the built-in flash; instead, rely on natural lighting.
—
### **Keep Your Camera Steady**
No matter how steady your hands are, always use a **tripod** or a **smartphone mount** to prevent blurry images. A simple trick is to set a **2-second timer** on your camera, allowing it to stabilize before capturing the shot.
—
### **Use a White Backdrop**
A white background enhances your product images by reflecting light and preventing color distortion. It also ensures a clean, professional look.
– Use a **sweep backdrop**, which smoothly transitions from vertical to horizontal.
– For small products, a **shooting table** is ideal.
– For larger products, use a **white sheet** or purchase a **photography backdrop**.
—
### **Leverage Natural Lighting**
Natural light is the easiest and most affordable way to achieve professional-looking product photos.
– Position your setup **near a window**, ensuring the light comes from the side (not behind or in front of the product).
– If the light is too harsh, diffuse it with a **white curtain, sheet, or paper**.
– Work quickly, as natural light changes throughout the day. For consistency, shoot at the same time each day.
—
### **Use a Reflector to Eliminate Shadows**
Since window light only hits one side of the product, use a **reflector** or a **white card** to bounce light back onto the product. This helps soften shadows and evenly distribute light.
—
## **Part 2: Optimizing Your Product Photos for Ecommerce**
### **Remove the Background**
A pure white background makes your product stand out and ensures a polished, professional appearance.
– Use **Adobe Photoshop’s Pen Tool** to create a precise clipping path around your product.
– If you prefer a simpler method, try **background removal tools** like Canva Pro or Shopify apps.
—
### **Keep Editing Minimal**
Your product photos should accurately represent what customers will receive.
– **Adjust color balance** to match real-life colors.
– **Fine-tune brightness and contrast** for a professional finish.
– Avoid excessive retouching that misrepresents the product.
—
### **Use a Consistent Image Template**
Creating a product image template ensures uniformity across your store.
– Choose a standard size between **1200px and 1600px** on the longest side.
– Use **guidelines in Photoshop** to center and align all product images.
– If your products vary in shape, a **square template** works best.
—
### **Reduce File Size for Faster Load Times**
Large image files slow down your website, which can drive customers away.
– Use **Photoshop’s “Save for Web” function** to reduce file size without sacrificing quality.
– Aim for a **quality setting of 60** to keep images sharp while reducing load time.
– Use